American Visa Guide
Step-by-step guide to US family immigrant visa consular processing through the London embassy — written from community experience.
This guide covers consular processing of US family-based immigrant visas through the US Embassy in London. It covers IR and F visa categories for spouses (IR-1/CR-1), children (IR-2), parents (IR-5), and family preference (F visas).
This process rewards overpreparation. When in doubt, follow the strictest interpretation of official guidance — supply more than asked, document more than required, and leave nothing to chance.
What this guide does NOT cover
- Local I-130 / DCF filing — used when a US citizen resides in the UK and meets exceptional criteria
- Adjustment of Status (AOS) — used when the beneficiary is already inside the United States
Visa categories at a glance
Immediate Relative (IR) visas have no annual cap — once the I-130 is approved the case moves straight to NVC. Family Preference (F) visas are subject to annual numerical limits and require the priority date to be current on the Visa Bulletin before NVC processing begins.
IR (Immediate Relative) visas — CR1, IR1, IR2, IR5 — are not subject to annual numerical limits. Once the I-130 is approved, the case moves straight through NVC and into the embassy queue. The timelines in this tracker reflect IR cases.
F (Family Preference) visas — F1, F2A, F2B, F3, F4 — are subject to annual caps and can have multi-year waiting periods. Before the embassy queue is relevant, the beneficiary's priority date must first become current on the monthly Visa Bulletin. Once current, the case enters NVC processing and follows the same London embassy process as IR cases. F visa holders should monitor the Visa Bulletin closely — the embassy queue only begins once a visa number is available. [Visa Bulletin]
Spouse of US citizen, married <2 years at US entry. Conditional green card, valid 2 years. Requires I-751 to remove conditions before permanent residency and citizenship eligibility.
Evidence at filing: This is the highest scrutiny category — USCIS is assessing fraud risk, not romance. Lack of financial integration is the most common weakness. Include: joint financial accounts, lease or mortgage in both names, insurance policies naming each other as beneficiaries, tax returns (joint preferred), photos over time organised with name/date/location, and travel history and communication logs.
Official infoSpouse of US citizen, married ≥2 years at US entry. Green card valid 10 years. No I-751 required. A CR1 automatically converts to IR1 if the marriage crosses 2 years before entry.
Evidence at filing: This is the highest scrutiny category — USCIS is assessing fraud risk, not romance. Lack of financial integration is the most common weakness. Include: joint financial accounts, lease or mortgage in both names, insurance policies naming each other as beneficiaries, tax returns (joint preferred), photos over time organised with name/date/location, and travel history and communication logs.
Official infoUnmarried child under 21 of a US citizen. Child must not be a US citizen at birth (if so, CRBA applies instead). Can be CR2 (parents married <2 years at entry) or IR2 (≥2 years).
Evidence at filing: Child's birth certificate naming both parents. If stepchild: marriage certificate of petitioner and biological parent. If biological parent is not the petitioner: evidence of legal custody or relationship. Proof of petitioner's US citizenship.
Official infoParent of a US citizen, where the petitioner is 21 or older. No annual cap. Green card valid 10 years. The US citizen child files the I-130 as the petitioner.
Evidence at filing: Petitioner's birth certificate naming the parent being sponsored. Proof of petitioner's US citizenship. If sponsoring a stepparent: marriage certificate of biological parent and stepparent, plus evidence that the marriage occurred before the petitioner turned 18.
Official infoClassification is determined at US entry, not at I-130 approval. Carry your original marriage certificate when entering. If your marriage crosses the 2-year mark before you enter, bring proof of that. The same applies to CR2/IR2 for children.
These categories require the priority date to be current on the monthly Visa Bulletin before NVC processing begins. Waits can range from months to over a decade depending on category and country of chargeability.
Unmarried adult child (21+) of a US citizen.
Evidence at filing: Child's birth certificate naming petitioner. Proof of petitioner's US citizenship. Evidence of child's unmarried status (e.g. statutory declaration). If the child has previously been married: divorce or death certificate for each prior marriage.
Official infoSpouse and unmarried children under 21 of a lawful permanent resident (LPR). Shortest wait among preference categories.
Evidence at filing: Marriage certificate (spouse) or birth certificate (child). Copy of petitioner's green card (front and back). Proof of termination of any prior marriages. Bona fide marriage evidence for spouse petitions.
Official infoUnmarried adult child (21+) of a lawful permanent resident (LPR).
Evidence at filing: Child's birth certificate naming petitioner. Copy of petitioner's green card (front and back). Evidence of child's unmarried status. Divorce or death certificate for any prior marriages of the child.
Official infoMarried child of a US citizen (any age). Spouse and minor children can be included as derivatives.
Evidence at filing: Child's birth certificate naming petitioner. Proof of petitioner's US citizenship. Child's marriage certificate. Derivative beneficiaries (spouse, children): their birth or marriage certificates.
Official infoSibling of a US citizen, where the petitioner is 21 or older. Longest waits of all preference categories — often 10+ years depending on country.
Evidence at filing: Birth certificates of both petitioner and sibling showing at least one shared parent. Proof of petitioner's US citizenship. If the shared parent's name differs on documents (e.g. through marriage): marriage certificate or name change documentation. Derivative beneficiaries (sibling's spouse and children): their birth or marriage certificates.
Official infoOnce a priority date is current and NVC processing begins, all categories follow the same London embassy process described in this guide. The timelines on the data page reflect IR cases — F visa holders should expect the same steps but cannot rely on the same wait time figures.
Reached a milestone in this section? Add your I-130 priority date and approval date to the community tracker →
The I-130 establishes a qualifying relationship between petitioner and beneficiary. It does not assess finances or issue a visa. Output is an approval (NOA2), which moves the case to the National Visa Center. [USCIS I-130]
Under current US policy (April 2025), USCIS determines sex from the original birth certificate and only recognises male or female markers. If your documents carry inconsistent sex markers, this can cause delays at USCIS, NVC, and the embassy medical. See the Medical section of this guide for full guidance and support resources.
If USCIS made a clerical error or you notice a mistake on your I-130 after filing, you can request a correction using USCIS's e-Request for Typographical Error Correction. This can be done at any stage — before or after approval. Submit evidence of the error and what the correct information should be.
If you are filing I-130 petitions for multiple family members — for example, a spouse and a child, or a parent and a sibling — USCIS will not automatically link them. You need to make the connection explicit so the cases move through NVC together. Follow these steps:
USCIS must review everything you upload. Keep your documentation high quality over high quantity — clear labels, organised files, and explicit connections between cases matter more than volume.
If your I-130 petition has been pending significantly longer than typical processing times — generally 18–24+ months after your priority date without approval — there are legal remedies available to encourage USCIS action. This section outlines those options in the order you might pursue them.
Demand letters. A demand letter is your formal notice to USCIS that you intend to sue if they don't make a decision by a specific date. It's not a request for them to review your case again — they're already reviewing it. The letter simply says "decide by X date, or we're going to court." A demand letter doesn't cause USCIS to deny your petition. If your case is denied after you send one, that's because of your case's merits, not because of the letter itself.
Writs of mandamus. A writ of mandamus forces a court order telling USCIS (or the embassy) to make a decision on your case. It can only compel them to decide — it cannot force them to approve you. Courts look at whether the delay is genuinely unreasonable by asking: Is this longer than similar cases normally take? Does the delay make sense given what USCIS was doing? To win in court, you need to show three things: you have a clear right to a decision, USCIS has a clear duty to decide, and you have no other way to get relief.
Going to federal court. Filing a lawsuit in federal court is complicated. You have to serve USCIS and other defendants properly, pay filing fees, follow court procedures, and meet various deadlines. It's an expensive and time-consuming process, which is why it's truly a last resort — you should try all other options first.
This is not legal advice. Filing a demand letter or writ of mandamus involves legal risk and procedural complexity. Before taking any action, consult an immigration attorney affiliated with the American Immigration Lawyers Association (AILA). They can review your specific case, advise on timing, and represent you if litigation becomes necessary.
- 12–18 months: Consider congressional inquiries and then a White House inquiry if case remains stuck.
- 18–24+ months: Demand letter and writ of mandamus become more viable if other remedies have been initiated and failed. Courts are more likely to view such delays as unreasonable.
For detailed guidance on all legal remedies — Congressional inquiry, White House contact, Demand letter, and Writ of mandamus — see our comprehensive remedies guide:
Significantly delayed I-130 petitions: remedies and escalation →
If a child is born in the UK to a US citizen parent, they may already be a US citizen at birth. If so, they do not need an immigrant visa — they need a CRBA (Consular Report of Birth Abroad) to prove that citizenship, plus a US passport to travel. This is handled entirely separately from the I-130 process.
If a child is a US citizen at birth, filing an I-130 (IR2) is the wrong route. Assess CRBA eligibility first — it is faster, cleaner, and bypasses the entire visa process. The operative question is whether the US citizen parent meets the physical presence requirement.
If the child is not a US citizen at birth, proceed with I-130 as an IR2.
- Official proof of US citizenship at birth for a child born abroad to a US citizen parent
- Must be applied for before age 18 — ideally soon after birth
- Strongly recommended before the child travels to the US, as US citizens must enter on a US passport
- A single appointment covers the CRBA, first US passport, and optional SSN application
- Child born in UK → apply at US Embassy London
- Child born elsewhere but living in UK → apply in London, but the case is forwarded to the embassy in the country of birth → longer processing
- Child already in the US → cannot apply for CRBA; citizenship is adjudicated via first US passport application instead
The US citizen parent must prove they lived in the US for at least 5 years before the child's birth, including at least 2 years after age 14. This is where most cases succeed or fail — weak evidence here causes delays or refusal. [travel.state.gov: Birth Abroad]
Physical presence does not need to be continuous — visits of any length count. However, any time outside the US must be excluded, including holidays and short trips. It does not matter whether you were in the US legally or illegally, or whether you held US citizenship during that time.
- Time actually within US borders (non-continuous periods add up)
- Honorable US military service overseas, or as a dependent of someone serving — requires official military records
- Employment with the US government or certain international organisations overseas, or as a dependent — requires official records
Accepted evidence includes:
- Official school transcripts from primary, secondary, or university
- W-2 forms with a letter from the employer's HR department
- Passports showing both US entries and exits (different passports may make travel dates hard to establish)
- Military records (Statement of Service or DD-214)
- Bank or credit card statements showing activity at specific US locations (e.g. ATM withdrawals, US restaurant charges)
- US medical records — but only for the exact dates of treatment
- CBP entry/exit records via FOIA request at cbp.gov
Not accepted as evidence of physical presence:
- US driver's licence (does not show when or for how long you were present)
- Diploma without transcripts (credits may have been earned abroad)
- Lease or mortgage (many people maintain property in multiple countries)
- Cell phone records
- Bank statements that don't show a US location
- Social media posts mentioning being in the US
- Income tax forms without pay stubs or W-2s (taxes can be filed from anywhere)
Sources: US Embassy CRBA — Proving Physical Presence (PDF) · US Embassy London — Oct 2025 Notice
- Long-form UK birth certificate (with both parents listed)
- Passport photo
- Child's other nationality passport (if applicable — you do not have to surrender it)
- Proof of US citizenship (US passport or naturalization certificate)
- Evidence of 5 years physical presence in the US before child's birth, including 2 years after age 14
- Marriage certificate (if applicable)
- Divorce or death certificates (if prior marriages)
- Passport or national ID
- DS-3053 notarized parental consent (if not attending in person)
- Prepaid Royal Mail Special Delivery return envelope — this is mandatory and must be brought to the appointment. Without it the CRBA and passport cannot be returned to you.
- The DS-11 must be left unsigned until you are at the appointment — do not sign it in advance.
- Not eligible for CRBA — if the physical presence requirement is not met, the child may need the Child Citizenship Act route or an I-130 immigrant visa instead
- Multiple children — separate appointments required per child, though they can be coordinated to run consecutively
- Lost CRBA — replacements must be requested from the US Department of State, not the London embassy
- Born outside UK — case is forwarded to the country of birth embassy; processing takes longer
Reached a milestone in this section? Add your NVC dates and DQ date to the community tracker →
After USCIS approves the I-130, your case transfers to the National Visa Center (NVC). NVC collects fees, the DS-260 visa application, financial documents, and civil documents before forwarding the case to the US Embassy London for interview scheduling. The goal of this stage is to reach Documentarily Qualified (DQ) status.
Full step-by-step NVC guidance is available via the community Discord NVC channels, which follow the official NVC process at Travel.State.gov.
⚠️ Most common RFEs (Request for Evidence)
- Missing or incomplete Form I-864 (Affidavit of Support): Joint sponsors and sponsors' spouses must also complete separate I-864s. Incomplete tax returns (missing all pages) trigger RFE immediately.
- Financial documents older than 6 months: Bank statements must be dated within 6 months. NVC may request updated statements even if earlier ones were accepted.
- Inconsistent information between forms: Mismatched names, birthdates, or addresses across the I-130, I-485, DS-260, and civil documents cause RFEs. Use exact legal names consistently.
- Police certificates missing or expired: Certificates must be original or certified. UK ACRO must be dated within 12 months of interview. Any country lived in for 12+ months after age 16 requires a certificate.
- Medical exam (I-693) submitted too early: The exam must be completed within 6 months of the consular interview. Submitting too early may require a repeat exam at your cost.
Front-load your documentation before submitting to NVC. Include supporting evidence for every claim: multiple bank statements, tax return transcripts from the IRS, employment verification letters with dates, and detailed personal histories with dates and locations.
🚀 Getting Started
Usually 1–7 days after I-130 approval (occasionally 2–3 weeks — not a cause for concern). NVC emails both the petitioner and beneficiary from National_Visa_Center@state.gov with the subject Notice of Immigrant Visa Case Creation. The email contains your NVC Case Number (3 letters + 10 digits) and Invoice ID Number (IVSCA + 11 digits). Save both — you need them to access CEAC.
If you do not log into CEAC or communicate with NVC for 12 months, your case can be terminated under INA §203(g) — even if NVC has not contacted you. Log in and upload documents every 6–11 months to keep the case active if your process is slow.
Log in at ceac.state.gov/IV using your Case Number and Invoice ID. It can take up to 72 hours after the Welcome Letter for the account to activate. CEAC is where you pay fees, submit the DS-260, upload documents, and receive messages from NVC.
💰 Payments & Application
| Fee | Amount |
|---|---|
| Immigrant Visa (IV) Application Processing Fee | $325 |
| Affidavit of Support Fee | $120 |
Requires a US bank account. The two fees must be paid sequentially — not simultaneously. Allow up to 10 calendar days for fees to clear before DS-260 becomes accessible. More info: NVC fee guidance.
The petitioner must meet 125% of the US Federal Poverty Guidelines based on household size. If income is insufficient or the petitioner lives abroad (foreign income typically counts as $0), a joint sponsor is required. Use the NVC Poverty Guidelines Calculator to check eligibility.
The I-864 must be wet signed — print, sign by hand, scan back in. Do not use a digital or e-signature. The I-864EZ is available for simple cases but many users encounter issues with it; the standard I-864 is recommended for all.
London has demonstrated reluctance to rely solely on assets. Cases relying primarily on savings, property equity, or investments have received 221(g) even when technically meeting asset thresholds. If income is close to the threshold, irregular, or asset-heavy — secure a joint sponsor before submission.
Use the worksheet to prepare all answers before entering CEAC. The form is long and CEAC is unreliable — working from a completed worksheet avoids losing progress.
📄 Open I-864 Worksheet📄 Documents & Verification
- IRS Tax Return Transcript — most recent year, from IRS.gov (create an account via ID.me if you don't have one). Use Tax Return Transcripts specifically — they have been accepted and verified by the IRS. Up to 3 years of transcripts is advised.
- W-2s / 1099s
- Proof of current employment — employment letter and recent pay stubs
- Joint sponsor: separate I-864, their own tax transcript, W-2s, proof of US status and domicile
- Evidence of US domicile (even if not listed as required) — upload under "Other": driver's licence, job offer, lease, US bills, school enrollment, moving quotation, or intent letter
The DS-260 is the immigrant visa application form, completed in CEAC. [CEAC DS-260] CEAC times out after ~10 minutes of inactivity and progress is lost. Prepare all answers in advance using the worksheet before logging in. Once submitted you cannot edit it — double-check everything.
You will need: passport details, all addresses from age 16, employment history (10 years), travel history (5 years), family information, and US contact details. Print the DS-260 confirmation page after submitting — it is required at the medical and interview.
For the vaccination question: if you plan to get missing vaccines at the medical, select "Other" and explain in the dialogue box.
For children who are US citizens (e.g. via CRBA), the answer to "Is the child immigrating with you?" is No — they are returning as a citizen, not immigrating.
Complete this before logging into CEAC to avoid losing progress to timeouts.
📄 Open DS-260 Worksheet🎯 Final Steps to Interview
- Birth certificate (long form with parent names)
- Marriage certificate
- Divorce or death certificates (if applicable — all prior marriages)
- UK ACRO Police Certificate — required for all applicants aged 16+. Valid 12 months for embassy purposes regardless of any shorter local validity.
- Foreign police certificates — required for every country lived in for 12+ months after age 16, or any country of citizenship. Use the decision tree below to confirm what you need.
- Passport biographic page
- Court, prison, or military records (if applicable)
Non-English documents require certified translations. Check the NVC Document Finder / Reciprocity Schedule for country-specific requirements. Scans must be colour, all pages included, max 4MB per file, PDF preferred. For certified translations, community members recommend Rush Translate.
After uploading all documents, click Submit Documents — uploading alone does not enter you into the review queue. Do not mail originals to NVC; bring them to the interview.
After submission, NVC reviews your case. Typical review time is 14 days if no issues.
Possible outcomes:
- RFE (Request for Evidence) — fix the issue, re-upload, resubmit. The 14-day clock restarts after each resubmission.
- DQ (Documentarily Qualified) — all documents accepted. Case moves to embassy scheduling queue. Your CEAC status will still show "At NVC" until you receive your Interview Letter.
If you have not heard from NVC within 10 business days, you should submit a Public Inquiry on the NVC website: https://travel.state.gov/content/travel/en/us-visas/visa-information-resources/ask-nvc.html
Some applicants deliberately delay paying NVC fees or submitting documents to control when their case enters the London embassy queue. Reasons include: waiting for a more convenient interview season, aligning with a job start date, or avoiding school-year disruption. This is a legitimate personal decision. There is no penalty for taking longer at NVC, and your I-130 approval date does not expire. However, be aware that the London embassy queue — and therefore interview slot availability — may be longer or shorter by the time you DQ, and this is difficult to predict more than a few months ahead. If you do hold at NVC, consider the Visa Bulletin and any known backlogs when deciding timing. Community data on the tracker reflects the current London queue position. ⚠️ 12-month inactivity rule — INA §203(g) If you do not log into CEAC or communicate with NVC for 12 months, your case can be terminated — even if NVC has not contacted you. If you are holding your case deliberately, log in and upload documents every 6–11 months to keep it active. Full submission checklist with financial documents, civil documents, upload standards, and failure points.
Use this to work out which police certificates you need. You may need more than one. All must be original or certified — photocopies not accepted. [travel.state.gov — Civil Documents]
If you are a citizen of a country you no longer live in — even if you left as a child — you almost certainly need a police certificate from that country. A visa will not be issued until this requirement is fulfilled satisfactorily.
The UK ACRO certificate is valid for 12 months. Police certificates from other countries are generally valid indefinitely, provided you have not returned to live there — but order early regardless, as processing times vary widely by country.
Obtaining a police certificate from a country you do not currently reside in can take months and may require you to travel there in person. Identify this requirement early and start the process as soon as you receive your Interview Letter — do not leave it until the document check.
Reached a milestone in this section? Add your interview letter date to the community tracker →
After DQ, your case is complete at NVC and enters the embassy scheduling queue. This stage is a waiting and preparation phase. Your CEAC status will still show "At NVC" until your Interview Letter arrives.
- Your interview has been scheduled
- Your case has moved to the embassy in CEAC — status still shows "At NVC"
- That you are guaranteed a visa
- That additional documentation won't be required
Wait times from DQ to Interview Letter vary and change over time. See the data page for current community averages.
How IL drops work
The embassy schedules interviews in batches, not continuously. Batches are not on a fixed schedule but tend to arrive at least once monthly — historically often in the second week of the month, though this varies. Occasionally there are multiple drops in one month. Whether you receive an IL in a given batch depends on your DQ date relative to others in the queue.
If you have multiple applicants on the same case — for example, a spouse and children who were ineligible for a CRBA, or stepchildren — they may reach DQ at different times and be assigned different interview dates.
You need to contact the embassy directly and ask for all cases to be combined into the same interview appointment. Include the IOE numbers (case reference numbers) for all applicants in the email. The embassy can bundle them together so everyone is seen on the same day.
Email: LNDIVSubmissions@state.gov
Do this as soon as you are aware of the differing DQ dates — do not wait until ILs have already been issued separately.
When do ILs arrive?
Based on observed London channel data, ILs arrive by email from National_Visa_Center@state.gov with the subject Immigrant Visa Interview Appointment, typically early-to-mid afternoon UK time (around 13:30–15:30), most often mid-week (Tue–Thu). A CEAC status update follows — it will show your case as being at the embassy.
Drop date, day, and time data is kept up to date on the data page — see the IL Drop History table there.
IL → Interview: observed pattern
Pattern observed from London community members. IL → interview is typically ~2 months.
What the IL email looks like
The Interview Letter arrives by email from National_Visa_Center@state.gov with the subject Immigrant Visa Interview Appointment, typically early-to-mid afternoon UK time (13:30–15:30), most often mid-week (Tue–Thu). A CEAC status update follows.
Immigrant Visa Unit · Embassy of the United States of America · 33 Nine Elms Lane, London, SW11 7US
Dear [Beneficiary],
Case Number: LND01234567891
Interview: [TIME] [DAY], [DATE]
We are pleased to confirm that the Immigrant Visa Unit at the U.S. Embassy in London has received an approved petition in your name. To complete your application, you must attend two separate appointments at the U.S. Embassy:
- Document Review – Immediately following your medical examination
- Visa Interview – With an immigration consular officer
[Email continues with steps 1–4 and public charge statement — see guide sections below]
Actions after receiving your IL
1. Book your medical via VisaMedicals — appointment windows open monthly and fill quickly. The medical must be 10 working days before your interview date. You are required to attend the same-day embassy document check afterwards (window: 11:45 AM – 1:00 PM).
2. Register your interview via AIS — you must select your passport return method at this stage: home delivery or Mail Boxes Etc collection (Holborn, Angel, or Belfast). If you do not complete this, the embassy has no way to return your passport to you. Note: registration may take a few days to appear after the IL arrives.
Registration on AIS may take a few days after the IL arrives. If you have previously used AIS for a non-immigrant visa (e.g. B1/B2), you will likely need to create a new account for the immigrant visa process. Escalate after ~5 business days if unresolved: UK.Visas@gdit-gss.com
Check your financial documents are current
If you were DQ before the current tax year filing deadline, and your medical appointment and interview are scheduled after the tax filing deadline (typically April 15 in the US), your financials may be out of date. Consular officers need to review the most recent tax year to make a public charge assessment.
What to do: Unless you have filed a filing extension (in which case you can upload an explanation), update your tax documents in CEAC so that consular officers can review the latest tax year.
- Get your transcript: Visit the IRS Get Transcript portal to download your Tax Return Transcript for the most recent tax year. You will need to create or log into an ID.me account for secure access.
- Format your files: Save your tax documents as PDF or JPEG files. Each file must be smaller than 2 MB.
- Log into CEAC: Go to the CEAC Login Page using your Case Number and Invoice ID.
- Upload: Navigate to the Affidavit of Support section and upload the new tax transcript, along with any relevant W-2s or Schedules, as supplemental or updated financial evidence.
Getting an ID.me account
The IRS now requires all users to verify identity through ID.me. This is a secure identity verification service used by multiple US government agencies.
- Visit id.me and click "Sign up"
- Choose to verify with your IRS account or use your driver's license, state ID, or passport
- Follow the identity verification prompts — you may need to take a selfie and photos of your ID
- Once verified, you will have instant access to the IRS Get Transcript tool
- Download your Tax Return Transcript and upload it to CEAC as described above
Use the waiting time to prepare
This period is your best opportunity to get organised before things accelerate. Work through this list systematically.
Two separate trips required — one for the medical + document check, one for the interview. These cannot be combined unless you have an expedited interview.
Public Charge — prepare your written statement
The public charge assessment is a demonstration of intent and planning. The officer wants to see that you have thought about how you will support yourself in the US to ensure that the beneficiary won't become a burden on the U.S. government.
You are strongly advised to submit a written statement before your interview via email to LNDIVSubmissions@state.gov and by uploading to CEAC. The embassy states that applicants may voluntarily submit this statement; community experience strongly suggests you should. See our sample template → Cover three areas:
- Housing: Where will you live? Provide an address if confirmed. If not yet secured, explain your plan — who you'll stay with, what area, and your timeline.
- Employment: What work do you plan to do? Include your sector, relevant experience, and whether you have a role lined up or are job-seeking. If continuing with a current employer's US branch, say so explicitly.
- Health insurance: How will you be covered? The most straightforward answer is being added to a spouse or family member's employer plan once your SSN arrives — state the plan, provider, and expected timeline. If you do not yet have coverage arranged, consider obtaining a quote for short-term international health insurance before your medical appointment — see the health insurance section below.
The statement doesn't need to be long or formal. A short, direct account of your housing, employment, and insurance plans is sufficient. The officer wants to see that you have a plan.
A strong I-864 from a qualifying sponsor is the primary public charge safeguard. The interview questions are an additional check. More info: travel.state.gov — Preventing Public Benefits Reliance
Health insurance — the coverage gap
There are two periods to plan for:
Before you arrive. Your US health insurance options typically don't begin until you are resident in the US and able to enroll. Short-term international health insurance can bridge this gap. Community members have used:
- Cigna Global — offers an online quote in a few minutes at cignaglobal.com. No commitment to purchase. The quote summary is a downloadable PDF you can include with your public charge statement as evidence that you have researched coverage.
- IMG Patriot America Plus — community members have obtained 6 months of coverage without needing a US SSN. IMG will issue a certificate of coverage, which can be included in your public charge statement.
These are community-reported examples only and are not recommendations. Research plans to find what suits your situation.
After you arrive. Once you are a permanent resident living in the US, you are eligible to enrol through the ACA marketplace at healthcare.gov. Plans are available at a range of price points and many people qualify for tax credits that significantly reduce the monthly premium. You can browse plans before you arrive so you know what to expect.
Get your quote or certificate of coverage before your medical appointment and bring a printed or digital copy to both your medical and your interview. If you are submitting a public charge statement to LNDIVSubmissions@state.gov ahead of your interview, include it there too. You are not required to have purchased a policy — a quote demonstrating you have researched and budgeted for coverage is sufficient.
Does the petitioner attend the medical or interview? No. Only the beneficiary attends both.
Do I need the original I-864 mailed to me? No. A printed copy is sufficient.
Do I need two separate trips to London? Unless you have an expedited interview, everyone makes two separate trips: one for the medical and document check, one for the interview. There is no exception for distance or cost. Plan accommodation and travel well in advance.
Expedited interviews
Expedited interviews are available in genuine emergency situations such as serious medical need. They are not a workaround for queue position. Community data shows 4 expedited cases — these are excluded from wait time calculations as they are not representative of the standard process.
To request: email NVCexpedite@state.gov
↑ Back to topReached a milestone in this section? Add your medical exam date to the community tracker →
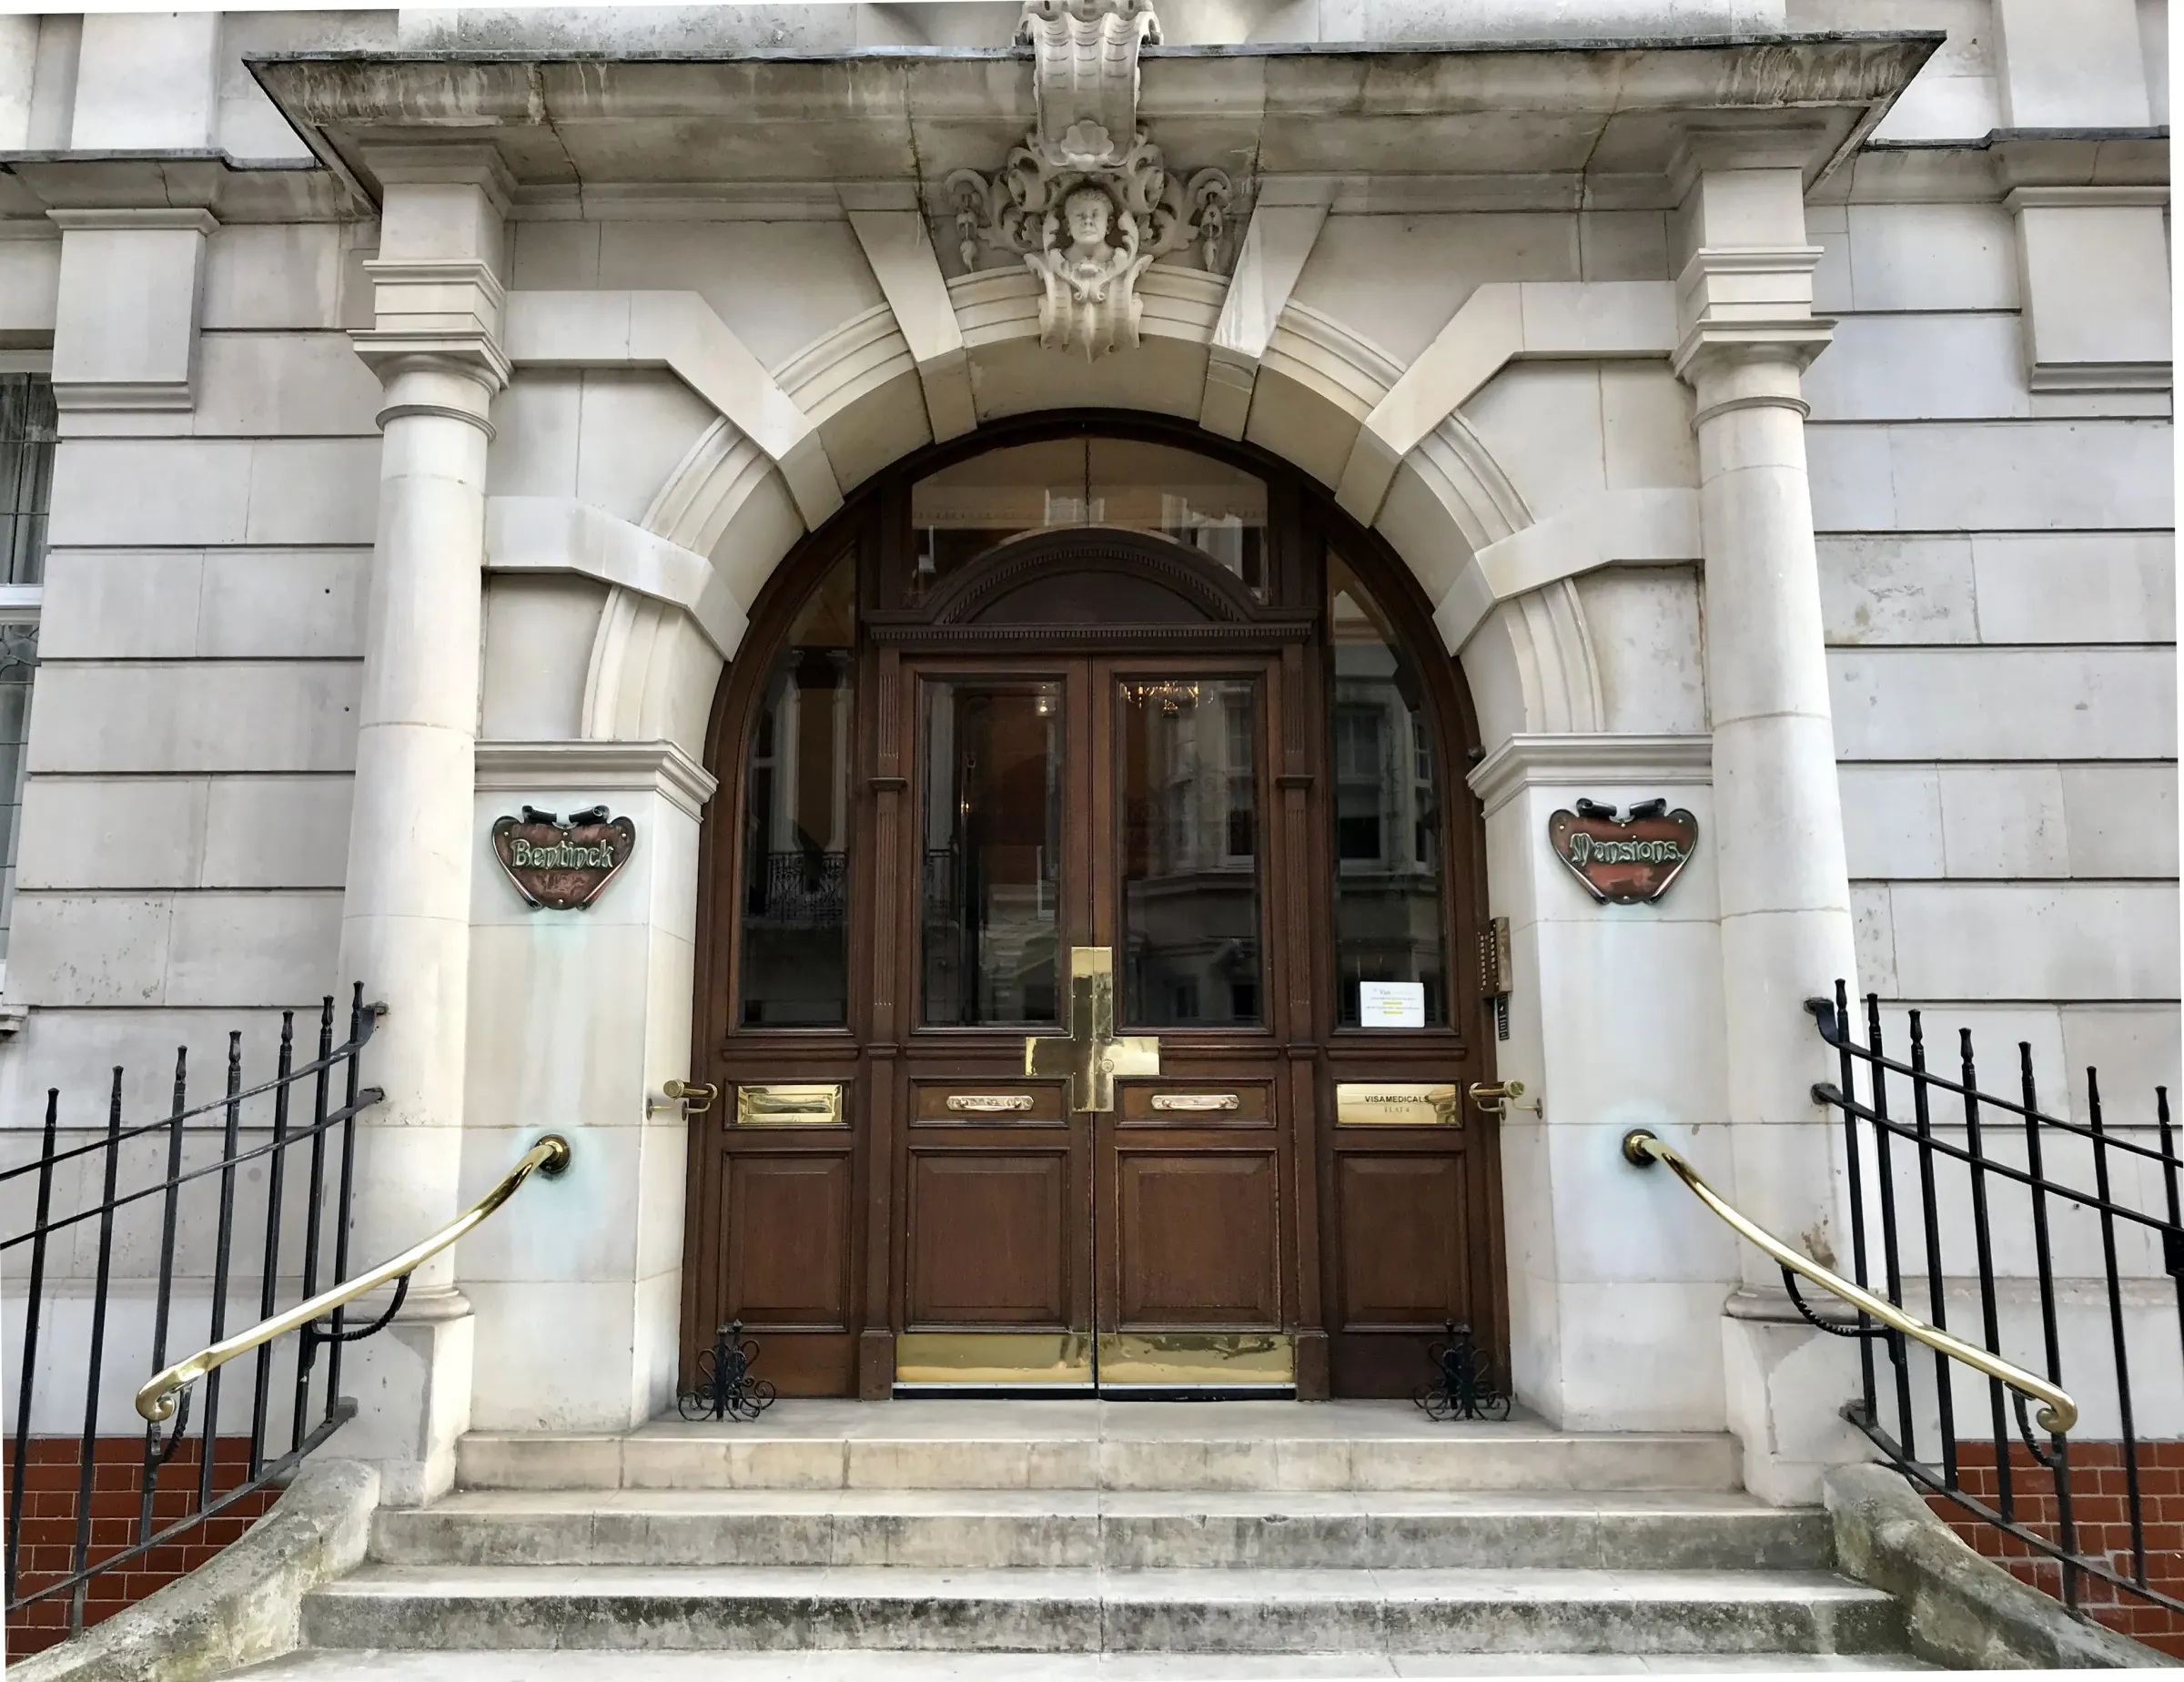
All applicants must complete a medical exam with an approved panel physician before the interview. For the entire United Kingdom, the only approved clinic is VisaMedicals in London.
Address: 4 Ground Floor, Bentinck Mansions, 12–16 Bentinck St, London W1U 2ER
Buzzer: Look for "VisaMedicals" marked on the right-hand side of the building — buzz Flat 4
Phone: 020 7486 7822
Email: bookings@visamedicals.co.uk
Hours: Mon–Fri 09:00–16:30
Website: visamedicals.co.uk/united-states
VisaMedicals entrance — Bentinck Mansions, 12–16 Bentinck St, London W1U 2ER
Timing and booking
The medical must be 10 working days before your interview. Visa Medicals appointment windows open monthly (e.g. May interviews can book from approximately 1 April). Book as soon as the window opens — slots fill quickly. You are required to attend the same-day embassy document check after your medical (window: 11:45 AM – 1:00 PM). VisaMedicals will contact the embassy on your behalf if you are running late. You will be charged £100 if you cancel within 3 working days of your appointment.
Have the following ready when you call to book: full name and date of birth of all applicants, case (LND) number, visa category, interview date, ACRO police certificate, and a contact phone number or email. The medical must be 10 working days before your interview date.
GP Summary Care Record
Request a GP Summary Care Record from your GP — timed within 2–3 weeks of your medical appointment. It should include applicant and GP details, significant medical history, current medications, ongoing problems. Some practices also include recent appointments and vaccination history. The summary care record and vaccination history does not need to be signed or stamped by the practice.
If you have a significant medical history (cancer, HIV, TB, depression, or other serious conditions), bring supporting reports outlining diagnosis, management, treatment, and current status. If anything further is required, the doctor will tell you on the day and you can email additional documents afterwards. VisaMedicals is understanding of a range of situations — contact them with any questions ahead of time.
What to bring to the medical
- Passport
- Interview letter The email sent to you by NVC notifying you of your interview date and location.
- DS-260 confirmation page
- Courier registration confirmation (with QR code) Generated when you register your passport return on the AIS website (ais.usvisa-info.com).
- Completed medical questionnaire (IV18a)
- ACRO police certificate
- GP summary dated within 2–3 weeks Does not need to be signed or stamped by the surgery or doctor — a printed or digital summary from your NHS record is sufficient.
- Vaccination records Does not need to be signed or stamped — a printout from your NHS app or GP patient record is accepted.
- Glasses or contact lenses (if applicable)
- Medical reports for any chronic, serious, or mental health conditions (if applicable)
- Psychiatric documentation (if applicable)
- TB or STI records (if applicable)
- Child health records (if applicable)
What happens at the medical
The medical examination assesses health-related grounds of admissibility. CDC guidance on the medical history and physical examination →
- Check-in and digital photo
- Document review
- Chest X-ray (age 15+)
- Blood test (age 18+)
- Urine test (age 18+)
- Physical examination (in a gown)
- Vaccine review and administration
You will receive a pink checklist slip at the end. Bring this to the same-day embassy document check — do not lose it.
Vaccinations
Common requirements: MMR, Tetanus/Diphtheria, Hepatitis A & B, Varicella (or documented history), Polio (within 12 months — see CDC Polio addendum for UK-specific requirements), Flu (Oct–Mar only). COVID-19 is no longer required. Hepatitis B requires three doses but you only need to have started the series — remaining doses can be completed in the US. Bring official documentation of past vaccinations; they will often take your word that you had chickenpox as a child.
Full CDC vaccination requirements for immigrants →
If you decline vaccines for medical, moral, or religious reasons, a waiver is required via USCIS I-601. The waiver process takes approximately 36 months. Until resolved, your medical will be marked inadmissible.
Chest X-ray is required for age 15+. You can defer until after birth or after 12-week scan. No live vaccines (MMR, Varicella) during pregnancy. Deferrals may delay visa issuance.
The medical includes a mental health assessment. Conditions such as depression, anxiety, and other mental health diagnoses are not automatically grounds for inadmissibility — the assessment focuses on whether a condition is associated with harmful behaviour. If you have a mental health history, bring supporting documentation from your treating clinician.
CDC guidance on mental health assessment →Under current US policy (effective April 2, 2025), USCIS recognises only male and female sex markers on immigration documents. Sex is determined by what is recorded on the birth certificate issued at or nearest to the time of birth. The X gender marker option has been removed from all USCIS forms and documents.
If your documents carry different sex markers — for example, your UK passport or a legal gender recognition certificate reflects an updated marker that differs from your birth certificate, or your medical records differ from either — this is likely to cause delays or a Request for Evidence. The medical examination at VisaMedicals records sex as shown on your documents, which may create a further inconsistency in the case file.
Practical steps:
- Before submitting to NVC or attending the medical, review all documents — birth certificate, passport, and any other identity documents — and identify any inconsistencies in the sex marker.
- Where your documents are consistent, use the sex marker recorded on your original birth certificate on all immigration forms to minimise the risk of delays.
- If you have document inconsistencies or your birth certificate does not list male or female, seek advice from an immigration attorney experienced in LGBTQ+ immigration before proceeding. Use the AILA directory to find one.
Support resources:
- Immigration Equality — provides free and low-cost immigration legal assistance.
- National Center for Transgender Equality — Immigration Documents
Official sources: USCIS April 2025 policy announcement · USCIS Policy Manual: Vol. 1, Part E, Chapter 5 · This is a rapidly evolving policy area. Guidance reflects the position as of May 2026.
Medical fees (Dec 2025 prices)
| Category | Fee |
|---|---|
| Adults 45+ (medical + X-ray) | £400 |
| Adults 25–44 (medical + blood) | £430 |
| Adults 18–24 (medical + blood + urine) | £450 |
| Children 15–17 | £365 |
| Children 14 and under | £250 |
| Additional tests | Fee |
|---|---|
| Drug screen | £95–£200 |
| QuantiFERON TB Gold Plus | £85 |
| TB Sputum Test (x3) | £130 |
| DNA Test (Adult) | £120 |
| Vaccinations | Fee |
|---|---|
| Diphtheria, tetanus and pertussis | £45 |
| Tetanus and diphtheria and polio | £45 |
| Measles, mumps and rubella | £50 |
| Hepatitis B | £55 |
| Hepatitis A & Hepatitis B combined | £80 |
| Varicella | £75 |
| DTaP + Hib | £75 |
| Pneumococcal (Adult) | £100 |
| Pneumococcal (Child) | £100 |
| Influenza | £25 |
| Hepatitis A | £65 |
| Hepatitis A+B (Child) | £80 |
| Hepatitis B (Child) | £40 |
| Meningococcal MCV | £70 |
| Polio | £60 |
Prices subject to change. Vaccines are billed separately if needed. Check VisaMedicals for current pricing.
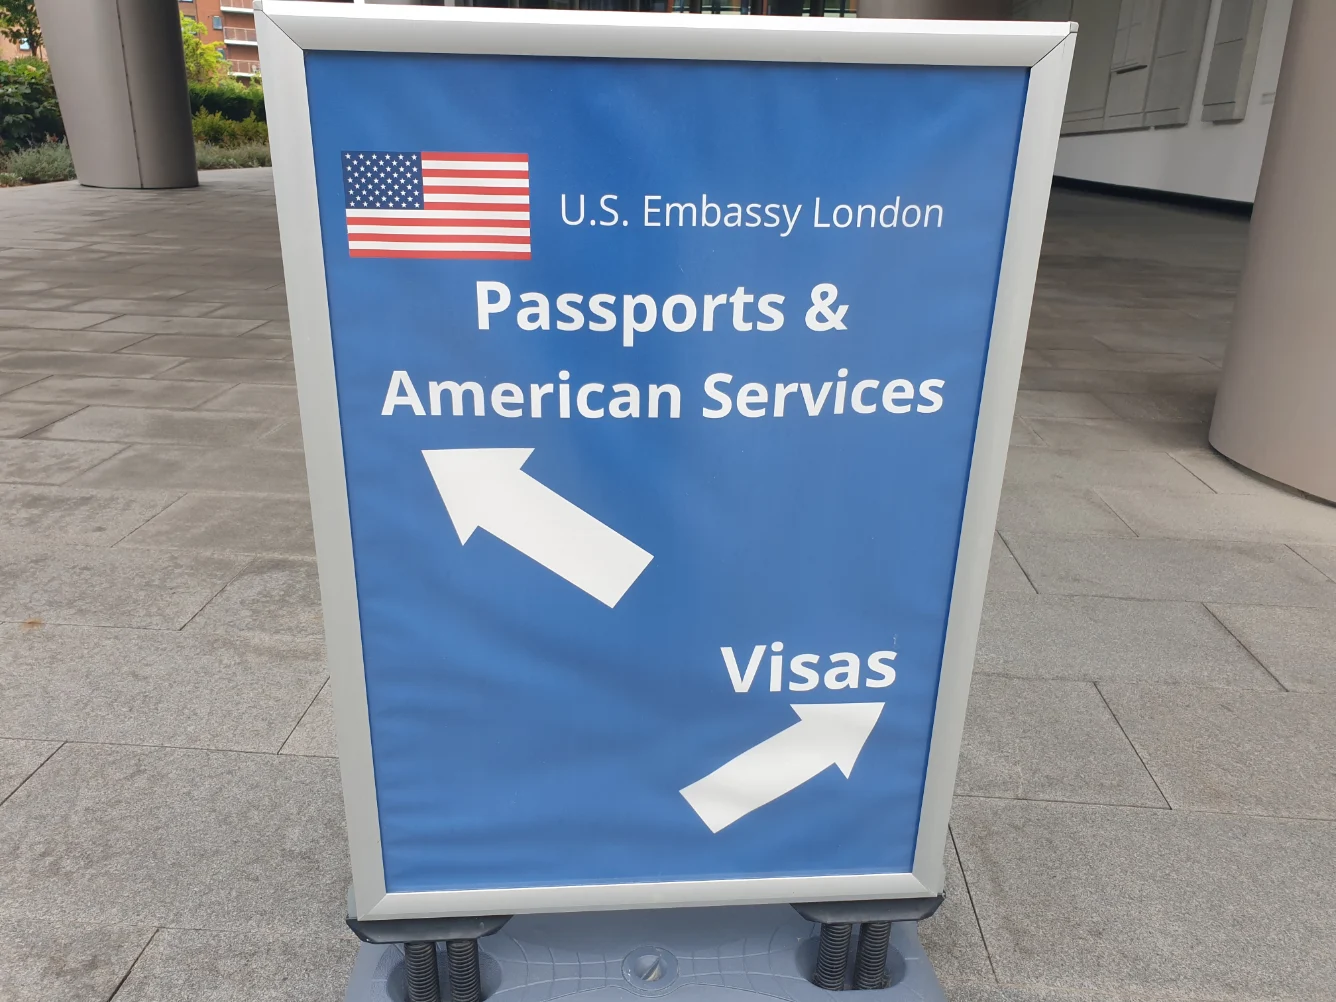
Same-day embassy document check
After the medical, go directly to the embassy.
Address: 33 Nine Elms Lane, London SW11 7US
Window: 11:45 AM – 1:00 PM — go even if running late
Getting there from VisaMedicals:
- Victoria line towards Brixton from Oxford Circus → Vauxhall, ~10 min walk — £3.10 contactless
- Bus 2 towards West Norwood from Portman Sq → Vauxhall Bus Station, ~12 min walk — £1.75 contactless
Do not stand in the main queue. On the right-hand side of the building, behind the main queue, there is a window with a sign that says "Pass Back". That is where you go. Present your pink checklist slip and passport. If you feel unsure, ask the staff at the head of the queue — they will direct you.
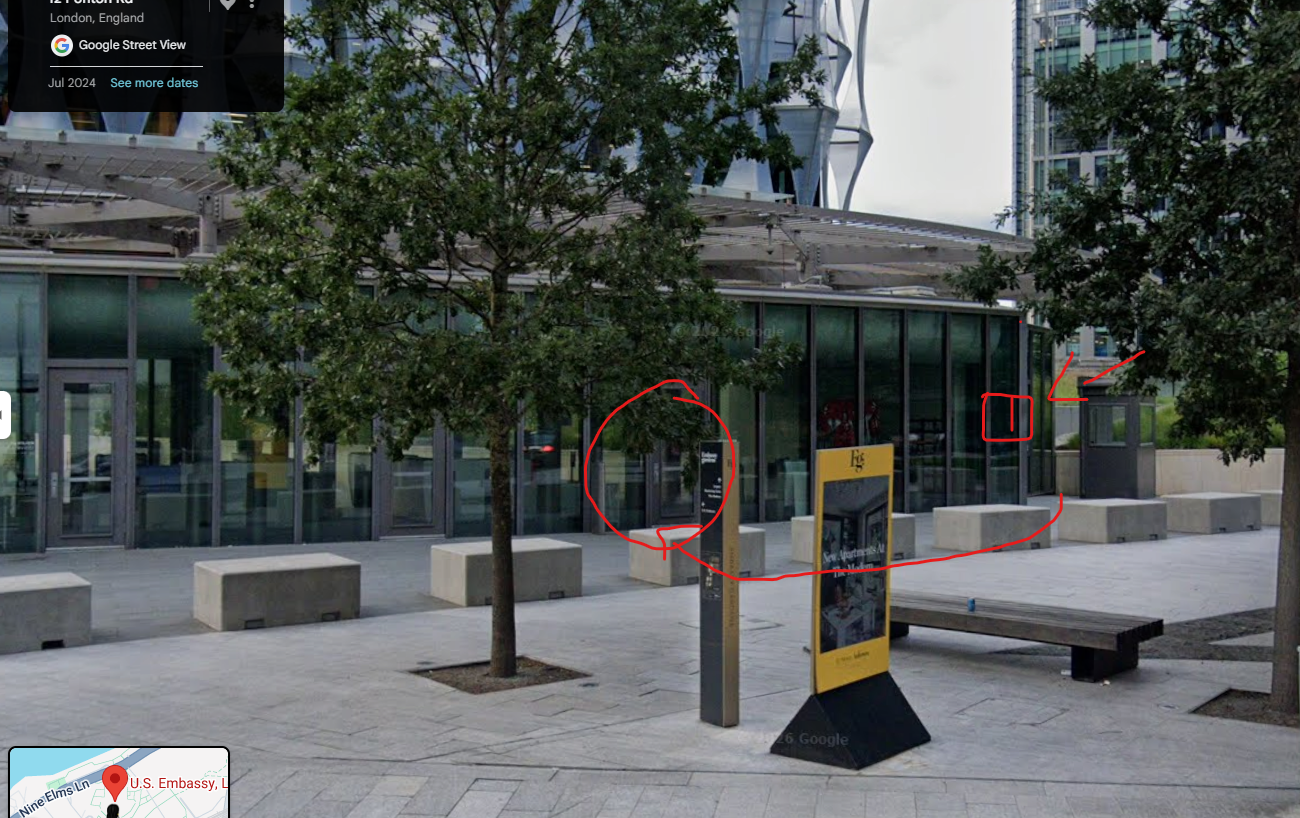
Entrance doors on the left, PassBack window on the right (with sign). Do not join the main queue — go directly to PassBack.
Inside: airport-style security, show your DS-260 confirmation, receive a queue number, wait upstairs. When called, go to the window where you will have your documents checked and your fingerprints taken at the same window — all done in one step during the document review. You will then receive a sealed "Do Not Tamper" envelope containing your documents for your interview — bring this to your visa interview. Documents are typically checked one by one — having them organised in separate sleeves or sections makes this smoother. Many members use one binder for the medical and a separate one for the embassy.
Bring to the document check
- Passport
- Pink checklist slip (from medical)
- DS-260 confirmation page
- Civil documents (originals)
Medical arrival 8:40 AM → finished ~10:15 AM. Coffee break. Document check queue opens 11:45 AM → finished ~12:15 PM. The document check is usually quick and staff will confirm everything is in order — many members find this reassuring.
What NOT to bring
- Laptops or large bags — see embassy visiting guidelines
Community medical experiences
Reported by London channel members. All found the process professional and manageable.
Check-in: Greeted at the door. Submitted passport, Summary Care Record (SCR), and vaccine record.
Process: ~20 minute wait, then doctor reviewed history, took bloods, and conducted physical exam. Chest X-ray also completed. Two vaccines administered by nurse.
Check-out: Paid £475 by card. Received document check paper. Described as "really smooth and reassuring."
Tip: Use hand cream before the appointment — fingerprints scan more easily.
Check-in: Efficient check-in. Documents collected at reception.
Process: Chest X-ray, then doctor exam (bloods, height, skin checks). Order may vary by clinic schedule. Tetanus booster administered (previous dose 2016).
Special note: Latent TB history. Doctor accepted a summary letter from prior employer. No further testing required.
Check-out: Received document check paper for embassy. Described as "pretty quick and easy."
Check-in: Arrived at 08:55 for 09:30 appointment and were seen ahead of schedule. Note: they may call you in before your appointment time if they have capacity. Documents retained: passport and medical docs. Certificates scanned and returned. 2x2 photos brought but not required — photo taken onsite at reception. Additional questionnaire completed on arrival covering medical yes/no questions.
Process: Chest X-ray (~30 min wait), then doctor exam covering height, weight, eyesight, neck, chest, abdomen, bloods, and medical history (~20 min wait), then nurse for vaccine review and administration (~25 min wait). Left at 11:04.
Check-out: Tetanus booster (£40), Hep B (£40), Flu (£20). Total cost: £495. Received pink slip for embassy.
Check-in: Attended with a baby and husband (husband waited with baby during exam). Clinic confirmed in advance that bringing a baby and a companion was acceptable. Note: the building is not step-free — two sets of wooden double doors and steps at each entrance. A pram requires assistance. Documents taken: passport, ACRO police certificate, vaccination records, medical questionnaire, interview appointment email printout, GP medical summary. Photo taken onsite.
Process: Nurse first for vaccine review, then chest X-ray (required to change into a gown), then doctor exam: questions about medical history, eyes and ears checked, chest listened to, sight test, weight, height, blood test. No urine test required. Partial Hep B series from before was accepted. Chickenpox history taken on word.
Check-out: £430 total (£400 base + £30 for blood test on applicant over 40). Received pink slip.
Check-in: Arrived at 09:05 for 09:30 appointment and were seen early. Documents taken at check-in.
Process: Standard exam flow. Left at 10:50 (85 minutes total). Wife had four vaccine shots due to no documented childhood vaccination history.
Clinic note: If there are any issues with X-ray or blood results, they will contact you within 3–5 working days. No contact means all clear.
Check-out: Received pink slip. Embassy document check took ~30 minutes total.
Check-in: "A breeze." Very efficient and supportive staff. Documents collected at check-in: passport, birth cert, police cert, vaccination record, interview letter, GP summary. Additional questionnaire completed on arrival.
Process: Standard exam flow.
Check-out: Pink slip issued. Embassy doc check completed successfully. Additional note: documents already uploaded to CEAC were not re-requested in paper form.
Check-in: Arrived at ~09:40 — recommended to go in about 10 minutes early as there's an additional questionnaire to complete. Documents taken: passport, birth certificate, vaccination record, medical questionnaire, ACRO police certificate, interview letter page, GP summary. Photo taken at reception. Questionnaire completed on clipboard.
Process: Chest X-ray, then vaccines, then doctor check-up with blood sample. Order may vary based on staff availability.
Check-out: Received pink slip. Described as "quick and efficient." Straightforward experience despite initial anxiety about the appointment.
Process: Standard exam. Medical + X-ray only. All vaccinations completed in advance — a mix of private and GP-administered. Private vaccination record taken to GP for updating. Printed combined record accepted at the medical.
Check-out: Paid £430. Received document check paper.
Embassy doc check: Documents accepted without issue. Received originals back in sealed transparent envelope with instruction to bring to interview.
Check-in: They prefer you arrive on time, not early. Photo taken (as honest assessment: "very shiny and sweaty with zero makeup!"). Required documents: passport, GP summary, vaccine history, ACRO police certificate, appointment email confirmation. Medical forms completed on arrival.
Process: Called back for different tests at different times depending on clinic schedule. Chest X-ray first, then vaccines, bloodwork, and GP screening. Staff adapted timing to keep appointment on schedule — when running behind, a nurse did the bloodwork instead of the doctor to stay on time. "Everyone was incredibly lovely and comforting. The blood test was painless. They love hearing about why you're moving."
Check-out: Given back passport, pink slip, and payment collected. Staff notified embassy if running late for document check — "No stress whatsoever!"
Check-in: Arrived early (10:25), completed waiting room form. Staff were "so nice and easy, all professional and very kind." Reception had a checklist of required documents on display. Photo taken. Staff patient while finding documents. Urine sample required (age-dependent).
Process: Chest X-ray (~5 minutes, radiologist very nice). Hepatitis B vaccination by lovely nurse (especially appreciated — "not a fan of needles"). Panel physician took the longest, asking questions about medical history, drug use, and previous surgeries. Missing GP report for anxiety diagnosis was acceptable with CBT Confirmation and Current/Previous Medications documentation.
Check-out: Given pink slip and advised everything sent to embassy within ~5 days if bloods and X-ray were good ("no news is good news!"). Then payment.
Across all reported cases: medical typically 1–2 hours, embassy document check 15–45 minutes. Staff consistently described as professional, efficient, and supportive. Bring your appointment letter but don't arrive more than a few minutes early — check-in happens only at your scheduled time.
↑ Back to topReached a milestone in this section? Add your interview date and outcome to the community tracker →
US Embassy London: 33 Nine Elms Lane, London SW11 7US
Nearest stations: Vauxhall or Nine Elms. Common nearby hotel: Travelodge Vauxhall.
What officers are actually assessing
By interview day, most of the process is already complete — USCIS has approved the petition, NVC has accepted all documents, civil documents are verified, and the medical is done. The interview is primarily a final consistency and eligibility check, not a full re-evaluation. Interviews vary in length and approach by officer — most are straightforward. A decision or next step is typically communicated on the day. If your passport is retained and you are verbally told that they intend to approve your visa, this is good news. Some cases are placed into administrative processing, and if this is the case you will receive further information about what is required to resolve this.
US Embassy London — 33 Nine Elms Lane, London SW11 7US
Arrival
Arrive 30–45 minutes before your scheduled appointment. Go directly to the staff member at the front and state clearly: "I am here for an immigrant visa interview." This is still the right first move — but be aware that in practice the queue situation outside can be chaotic, particularly at early morning slots.
One community member's experience from June 2026 indicates that staff at the entrance directed all applicants into a single queue regardless of visa type, at least until the building opened. This may not reflect the norm — other members have gone straight in on stating they had an immigrant visa interview. If you go to the front and identify yourself as an immigrant visa applicant, you may still be told to join the queue.
Recommended approach: Go to the front as soon as you arrive and make clear you have an immigrant visa interview. If staff direct you to join the queue, do so immediately — do not hang back. Being compliant but early in the queue is better than hesitating and ending up further back. Once you reach the front window inside, state that you are there for an immigrant visa interview and you will be directed straight in. Everything after the entrance is smooth and efficient.
If you are with someone, it may help to have them hold your place in the queue while you check with staff whether immigrant visa applicants have a separate line.
What to bring
- Passport
- Sealed document packet (received at document check)
- Courier registration confirmation
In practice, these are often the only documents physically reviewed — most materials were pre-verified at the document check. Bring originals of everything else (I-864, marriage certificate, ACRO, tax documents, DS-260 confirmation) but expect they may not be requested. Officers rely primarily on what is already uploaded to CEAC.
- Laptops or large bags
- Unuploaded financial documents — the officer will not accept them
- "Backup" paperwork not already in CEAC
Financial issues are the dominant cause of 221(g) at London. If it is not already in CEAC before interview day, it is too late.
If your hotel cannot hold items, two options nearby: District Coffee (Nine Elms) and World Heartbeat Cafe.
The interview takes place at the South Pavilion, which is a separate building alongside Ponton Road on the south side of the embassy complex. Do not go to the main Nine Elms Lane entrance. Follow signs or ask staff to direct you to the South Pavilion Consular Services entrance.
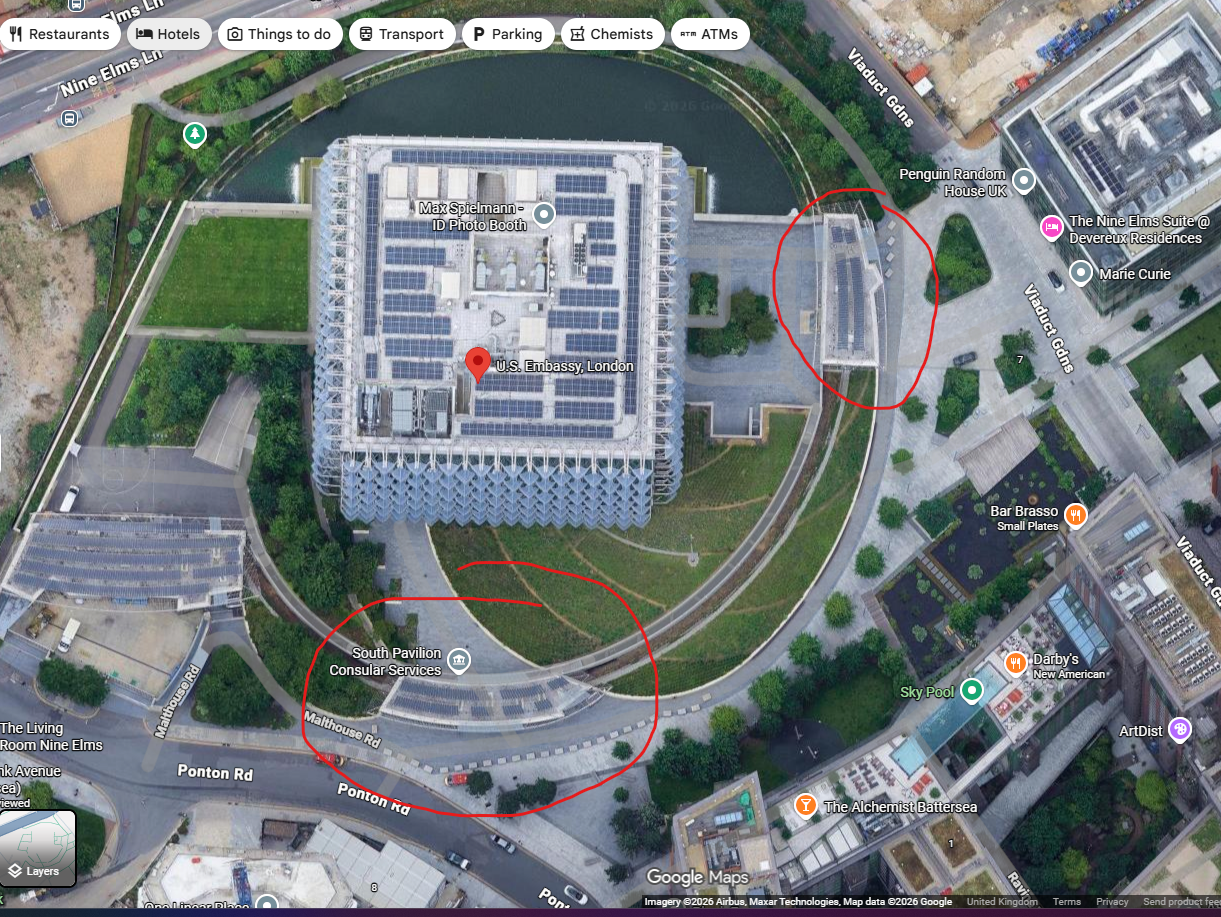
South Pavilion is on the south side of the embassy complex, accessed via Ponton Road
Interview structure
Common interview questions
Relationship
- How and when did you meet?
- When did you meet in person?
- When and where did you marry?
- Prior marriages?
- Children or stepchildren?
Living & financial
- Where does your spouse live?
- Where will you live in the US?
- What does your spouse do for work?
- Who is your joint sponsor?
- Arrest or residence history?
Answers must match your DS-260 and CEAC documents exactly. The interview is a consistency check — not a new evaluation.
Community interview experiences
All reported outcomes below are approvals. The pattern is consistent: short interview, long wait, professional officers.
Common pattern across all cases: skip the main queue, state "immigrant visa," two-step process (document window then interview window), interview 1–10 minutes, decision immediate. Check your sticker has the correct name and case number.
London visa enquiries: +44 20 3608 6998
Reached a milestone in this section? Add your visa approval date and passport in hand date to the community tracker →
Possible outcomes
Passport retained for visa printing. No further documents required. Community data: 94% of recorded outcomes at London are approved at interview.
Case paused pending additional items. Most common cause at London: financial sponsorship issues. Sometimes due to past visa denials.
Follow instructions emailed to you. Upload any requested documents to AIS (the same system used to register your appointment) and, if instructed, follow up with documents sent via courier.
If the beneficiary holds citizenship in a country affected by the current visa pause, the visa cannot be approved at this time. This is not a denial and not AP. If the beneficiary holds another unaffected passport, use that — ensure it is uploaded to CEAC.
The consular officer will explain the refusal and whether recourse is available. If eligible, you may file Form I-601 (Application for Waiver of Grounds of Inadmissibility). Form I-601 must be sent to a US address even if you are outside the United States. See the I-601 flowchart for filing guidance.
CEAC status tracking
Track at ceac.state.gov using your LND case number and passport number.
- Ready — case at embassy or pending final processing
- Administrative Processing — normal during final checks and printing after approval. Short-term AP after a successful interview is routine and is not the same as a 221(g).
- Issued — visa approved and printed. Passport will be handed to courier next.
Tracking your passport
AIS tracking mostly stays at "Appointment" and doesn't reflect where the passport actually is. The most reliable signal is the email notification when the passport is released to courier.
donotreply@usvisa-info.com — subject: "Yatri: U.S. Department of State Visa Documents Ready for Pickup". This confirms your passport has been released to the courier.
noreply@mbeglobal.com — home delivery notification from Mail Boxes Etc.
Passport return timelines
Typically 2–3 working days after interview. Example: Thursday interview → Monday/Tuesday pickup. Community average: 4 days.
Bring valid photo ID and your tracking number. MBE will hold your passport for 30 working days before returning it to the embassy.
Holborn: 19 Bury Place WC1A 2JB — Mon–Fri 09:00–18:00
Angel: 8 Duncan Street N1 8BW
Belfast: 38 Montgomery Business Park BT6 9HL — Mon–Fri 08:30–16:30
Visa queries: 0208 064 1342
Typically 5–7 days after interview, up to 2 weeks depending on routing. Community average: 11 days.
Watch for email from noreply@mbeglobal.com. Weekends and UK bank holidays may delay delivery — late-week interviews often shift into the following week.
USCIS Immigrant Fee ($235)
Pay the $235 USCIS Immigrant Fee to start green card (Form I-551) production. [USCIS: Immigrant Fee] You can pay before or after entering the US — the timing affects when your card arrives:
- Paid before entry — card may take up to 90 days from your entry date
- Paid after entry — card may take up to 90 days from your payment date
- Not paid — card cannot be processed until you pay
Paying before you travel is recommended — it starts the clock earlier and avoids one less task after arrival.
- Pay via the direct link at my.uscis.gov — no login required to pay. Once paid, the IOE receipt number can be added to the beneficiary's myUSCIS account for tracking.
- A-Number: the Registration Number on your visa stamp. If fewer than 9 digits, the site adds a leading zero automatically
- DOS Case ID: the IV Case Number on your visa stamp, minus the last two digits (e.g. "ABC1234567801" → enter "ABC12345678"). The IV Case Number on your stamp has two extra digits at the end (such as 01 or 02) — do not include these.
- Pay at: my.uscis.gov by credit/debit card or US bank account (ACH)
If you do not pay, no physical green card will be produced. You can use the visa stamp in your passport until the card arrives, but the stamp causes issues for many employers and institutions unfamiliar with immigration status. Do not leave this fee unpaid.
Tracking your green card after payment
The green card is officially Form I-551 (Permanent Resident Card). When you pay the $235 fee, USCIS issues a receipt with an IOE number. This IOE number is associated with Form I-551 — it is distinct from both your visa case number and the IOE number assigned with your I-130. Use this I-551 IOE number to track green card production.
- Track status at egov.uscis.gov or via platforms like Case Tracker using the IOE number from your payment receipt
- The beneficiary should have their own myUSCIS account — this allows them to track the case directly and submit a change of address through the portal if needed
- The petitioner (primary sponsor) and any joint sponsors should also have their own myUSCIS accounts linked to the case
If your address changes after entering the US, the beneficiary can submit an AR-11 address change through their myUSCIS portal — faster and more reliable than the paper form. Having accounts set up before the green card is in production means you can act immediately if anything needs updating.
Enumeration on Entry — applying for your SSN
Enumeration on Entry is the process of applying for both your immigrant visa and Social Security Number (SSN) simultaneously via the DS-260. If you selected "Yes" on the DS-260 question about SSN application, the Social Security Administration (SSA) will process your application and you should receive your SSN card automatically after arrival.
- If you enrolled on DS-260: SSA will initiate your application automatically. You should receive your SSN card by mail within 10 business days of arriving in the United States. SSA FAQ on Enumeration on Entry
- Appointment not required: According to the SSA, an in-person appointment is not necessary if your application was submitted via DS-260. SSA — Apply for an SSN
- If you haven't received it by 7–10 business days: Visit your local SSA field office to check the status and request expedited processing if needed. Some field offices will state that you should use your local office and may not process your request at another location — confirm with your local office before visiting
- Bring your passport with the visa stamp when visiting the SSA office — this serves as proof of entry and immigration status while you wait for your green card
Once your visa is in hand and your flight is booked, there are UK-side obligations to address before departure. Some have time-sensitive deadlines that can affect your finances or rights after you leave.
UK obligations — before you leave
If you want to retain UK voting rights, register before you leave: gov.uk/voting-when-living-abroad
When leaving the UK, file a P85 form to establish non-UK residency. This prevents incorrect taxation, may trigger tax refunds (note: HMRC typically mails a paper cheque to your US address — ensure you have a way to deposit it), and establishes your departure date for UK tax purposes.
You can continue making voluntary NI contributions while living in the US. This is worth considering carefully:
- 10 years of contributions = minimum eligibility for UK State Pension
- 35 years of contributions = full UK State Pension
- Voluntary contributions are relatively inexpensive and the UK State Pension is index-linked — many UK emigrants consider continuing them good value
This is one of the most commonly missed and costly issues for UK → US movers. Once you become a US person (green card holder), ISAs lose their tax-advantaged status in the US. Worse, Stocks & Shares ISAs typically hold non-US funds classified as PFICs (Passive Foreign Investment Companies) under US tax rules.
PFICs are heavily penalised in the US: complex annual reporting (Form 8621 per fund), punitive tax treatment on gains, loss of favourable capital gains rates, and significant compliance costs.
Cashing out ISAs after becoming a US person triggers PFIC taxation. The options before becoming a US person are: liquidate ISA holdings, restructure into US-compliant investments, or accept ongoing reporting complexity.
Speak to a UK/US cross-border tax professional before making any decisions. Do not assume your UK accountant or a standard US tax preparer will handle this correctly.
Reached a milestone in this section? Add your date of entry to the US to the community tracker →
Present your passport with the immigrant visa at the port of entry. You are admitted as a lawful permanent resident from this moment.
At the port of entry
- Confirm or update your US address with the CBP officer — this determines where your green card is mailed
- London processes documents digitally — your visa will show "IV Docs in CCD", meaning your documents are available to CBP electronically at the border. You do not need to present a sealed envelope to CBP. Note: some other embassies still issue a physical sealed envelope to present at the border — London does not.
- If you have Global Entry, inform Global Entry in person of your change of visa status — easiest to do as you enter as a green card holder
Several airports outside the US have CBP preclearance facilities. Clearing here counts as your official port of entry — you arrive in the US as a domestic passenger with no immigration queues on arrival. All are valid for immigrant visa holders.
07:00–16:30 IST
Shannon (SNN)
09:00–17:00 IST
Vancouver (YVR)
Montreal (YUL)
Calgary (YYC)
Edmonton (YEG)
Ottawa (YOW)
Halifax (YHZ)
Winnipeg (YWG)
Note: AUH no longer issues physical entry stamps — contact deferred inspection on arrival if needed
Benefits: Arrive as a domestic passenger — no immigration queues on arrival. Typically faster, more predictable processing. Global Entry available at most locations.
Drawbacks: Limited options after clearing (especially Shannon). Fewer backup flights if delays occur. Restricted movement once through preclearance. Irish preclearance has fixed hours — flights outside those hours clear CBP on US arrival instead.
Puerto Rico, the US Virgin Islands, Guam, American Samoa, and the Northern Mariana Islands are US territories. Entering via San Juan (SJU) or other territory airports is a valid port of entry for immigrant visa holders — you activate your green card there, exactly as you would at a mainland US airport.
If you are settling in a territory rather than a US state, note that some USCIS processes and SSA procedures may differ slightly from the mainland.
Green card
Green card (Form I-551) production begins once you pay the $235 USCIS Immigrant Fee. Delivery timelines per USCIS:
| Entry | Fee timing | When to expect card |
|---|---|---|
| Entered on immigrant visa | Fee paid before entry | Up to 90 days from entry date |
| Entered on immigrant visa | Fee paid after entry | Up to 90 days from payment date |
| Entered on immigrant visa | Fee not yet paid | Card cannot be processed until fee is paid at my.uscis.gov |
Source: egov.uscis.gov — When to expect your Green Card
Your green card is mailed to the address given at your visa interview, or the updated address at port of entry. If you move after arrival, update your address in the beneficiary's USCIS account (or by mail via AR-11) within 10 days — this is a legal requirement. The petitioner and any joint sponsor are also legally required to notify USCIS of an address change.
One community member's card was delivered to a previous address despite having updated it — the landlord forwarded it, adding a week's delay. After entry, take a screenshot of your address in your USCIS account to confirm it's correct.
Tracking numbers often don't appear in USCIS online status. To get your USPS tracking number contact USCIS directly: Ask Emma chat at uscis.gov, or call 1 (800) 375-5283 and request a live agent.
Some members receive an I-797C notice after entry requiring an Application Support Center (ASC) biometrics appointment before the green card is issued. This is not standard but has been seen where USCIS cannot use biometrics already on file — known triggers include prior green card holders (previous biometrics expire after 15 months) and photo or fingerprint quality issues from the embassy interview.
If you receive this notice: bring the I-797C, valid photo ID, and passport with visa stamp. Card production typically follows within days of the appointment. Do not skip it — the green card will not be produced until biometrics are completed. This does not indicate a problem with your case or PR status.
The Service Center code on the notice (e.g. FCE = Florida) reflects the processing centre, not your state of residence. The TCR field may be blank — this is normal.
Social Security Number
The SSN card is initiated automatically if you selected that option on the DS-260 — no separate action required. [SSA: SSN for Immigrants] There is no way to track the card once it is in the mail.
If your card hasn't arrived within 10 business days of entry, go to your local SSA office. Several members found the SSA had no record of their application despite having selected the option on the DS-260 — in those cases, staff processed a new application on the spot. Bring your passport with visa stamp and foreign birth certificate.
If the officer is unfamiliar with immigrant visas or asks for an I-94, the SSA's own policy manual explains how to process IV holders. It can help to bring a printout: secure.ssa.gov/poms.nsf/lnx/0110211025
Walk-ins are accepted at some offices — check Google reviews for your local office before going. Make or change an appointment here.
Common issues: card sent to wrong address, apartment number not recorded, card not initiated despite DS-260 selection. Confirm your full address including apartment number explicitly with SSA staff.
USPS Informed Delivery shows you scanned images of arriving mail before it's delivered. Sign up immediately after arrival — you'll see the green card and SSN card coming before they land in your mailbox.
Your data helps the community — takes 5 minutes
↑ Back to topGreen card, SSN, banking, tax obligations, Selective Service, and where the community has settled. Includes a live map of member locations across the US.
🏠 Go to Life in the USA →